
[UO][EC] Fishing: tips, tricks, macros, Actions>Command, and code

Hello,
A couple of people requested I share some of the EC setup and macros I use for fishing, so here is that information.
This will start off slowly but build to more complicated macros with multiple Actions>Command (scripts).
Simple shore fishing examples will mostly be used, but these simple building blocks can be expanded to generate long macros or extrapolated to any type of fishing (or really any type of resource gathering).
Throughout this post I will refer to information previously posted in other threads. Rather than repeat that information, the relevant threads are linked below.
For
a walkthrough creating Organizer Agents, click here.
For
information about the Character File, click here.
For
information about writing Organizer Macros, click here.
For
information about obtaining Object ID's, click here.
--
To get started, you'll need a fishing pole, available from provisioner
or fisher NPC's. With a normal fishing pole, you will fish up [footwear / messes
of small fish] about 1 of every 9 casts (11%), with about a 50 / 50 split
between the footwear and messes of small fish. All examples in this thread use
a normal fishing pole to demonstrate how to deal with footwear / messes of
small fish.
A different fishing pole option might be the 2nd year veteran reward BG's Fishing Pole, which will prevent you from fishing up footwear.
If you choose to fish with a normal pole, you
may want to consider getting a bonded pet crab, goat, or slime. You can feed your
pet all the footwear you fish up and, if bonded, resurrect your pet after some
sea creature kills it. In addition to footwear, pet slimes will also eat messes
of small fish. Note: the Coconut Crab from the UO store will not eat footwear.
If you want a pet crab that eats footwear, it must be the “Hungry Coconut Crab” from the Charybdis encounter.
You will probably also want a bonded pack animal (or five) to help out with transporting fish, or to hand fish to if you're dungeon fishing.
A galleon will also be useful as these larger ships with larger holds can store a lot of fish. Taking on the Fish Monger
quests without a galleon is not recommended.
Finally,
you may want to get some Fisher / Trapper bushels from the Huntmaster's
Challenge. These bushels reduce the weight of fish and can double the weight
capacity of a pack animal or ship's hold.
--
Before actually starting to fish, I would suggest setting up some
organizers. Organizers are quite beneficial for fishers. I personally have one
organizer for each of the following:
Shallowwater Fish
Deepwater Fish
Dungeon Fish
Crab
Lobster
Footwear (all 8 styles you get while fishing - set pet as default container)
Messes of Small Fish (all 4 types you get while fishing - set pet as default
container)
Delicate Scales / White Pearls
Treasure Map
MiB
Nets
Sea Serpent Loot (hides, scales, steaks, gold, reagents)
Crab / Lobster (combined)
All Fish (combined)
So, 14 organizers total. This allows me to call each organizer separately and direct each organizer into different containers.
Ok, if you're ready and you've got some basic gear and Organizers, let's start fishing.
--
You can fish by hand by clicking on the fishing pole, then a
water tile. Some people enjoy this fine control of the game world and consider
clicking on each piece of the UI and then the world tiles the correct way to
"play" the game. If that's your thing and you want to fish that way,
go for it!
For those who want the game to handle some of the button clicking for them, you can write a macro. You can have small macros that do very little or create complex macros that do quite a bit. It's really up to you and how you want to "play" the game.
If you're still reading this thread, then you are probably interested in macro creation for fishing. Before we write macros, let's talk generally about macro creation. When building a macro, it helps to outline the macro to understand what you want the macro to do. After you know what you want, you can piece the macro together in the Macros section of the EC's in-game UI. Just be aware that while you can build very long and complicated macro's with the in-game UI, the longer the macro, the more cumbersome it becomes to work with in game. For longer macros, working directly in the Character File, where macros are stored for each character as code, will be much easier. You'll have to decide for yourself when the transition from in-game UI to Character File code occurs. A warning; if you build a long macro within the Character File, then try to edit that macro in-game, the EC may crash to the desktop as the in-game UI attempts to load all of those icons.
Let's build some macros!
--
Basic Fishing Macro: the macro should fish and repeat.
We will set the macro to loop 10 times. A fishing action takes 8 seconds, so in our macro we will fish, and then wait for the action to complete. This way, the macro will only loop and restart after the fishing action is complete. We will set our delay to 9 seconds not 8, to give ourselves some room and to make the math easier.
Target by Resource
Delay 9
(EC integrated Loop Delay 1)
Loop (10)
The loop setting is in the header of the macro. The instructions are in the body of the macro. Each macro has one header. Each macro has infinite instructions. If the macro is set to loop, when the end of the macro instructions are reached, the EC will apply a 1 second pause and then begin the macro instructions again. Our Basic Fishing macro will Loop 10 times, with a 10 second delay (9 as per our instruction + 1 for the loop delay) each time. The total time our macro will run is 100 (10 x 10) seconds. If the macro is running and we want to stop the macro, we can push ESC.
Below left is the Basic Fishing macro built in the EC's UI.
Below right is the macro as code in the Character File. 
The “Macro id” for this macro is 29. That is the number of
the macro in your list of macros; it is not the position of the macro in that
list. If you have 5 macros, then delete number 2 and make a new macro, the EC
will assign the new macro the first available number (in this case 2), but
place the macro at the end of the macro list. If you want to keep copies of
your macros in .txt files, it can be helpful to ## the macro id (i.e. Macro id
= ##) as a reminder to re-number your macros for each specific Character File.
--
Most fishing spots produce more than 10 fish, so let's expand our basic fishing
macro to last a bit longer and catch a few more fish.
Longer Basic Fishing Macro:
Target by Resource
Delay 9
Target by Resource
Delay 9
Target by Resource
Delay 9
(EC integrated Loop Delay 1)
Loop (10)
For this macro we've repeated a set of instructions (Target by Resource, Delay 9) three times. So, for each loop, the macro will perform 3 fishing actions instead of one. The total time per loop will be 28 seconds (9 + 9 + 9 + 1). We will be performing 10 loops, so the total time for the macro will be 280 (10 x 28) seconds.
Below left is the Longer Basic Fishing macro in
the EC's UI. Below right is the macro as code in our Character File.
Comments
--
Now that we're fishing, a lot of things are appearing in our backpack. For Shallowwater fishing we likely have: 12 types of fish, 8 types of footwear, 4 types of messes of small fish, delicate scales, and white pearls. We have some choices on how to deal with everything we're acquiring.
If you've written all your organizers, when your main pack gets full, stop fishing, select the organizer to feed footwear and / or messes of small fish to your pet and run it. If your pet won’t eat messes of small fish, you can eat them by double clicking on them, drop them at your feet, or “Organize” them into a public trash receptacle. If you've got a pack animal, or ship's hold, as the destination for your Shallowwater Fish organizer, run that as well. Now your pack should be mostly empty. You may also have some delicate scales or white pearls that you would like organized into an animal’s pack or ship's hold. Where things go and how much you can take care of with just a few organizer clicks is really up to you. However, wouldn't it be nice if we didn't have to run so many organizers? Let's see if we can reduce the number of organizers we need to run.
If we drag a mess of small fish from our main pack to an otherwise blank macro, then run the macro, our character will eat the mess of small fish. However, if we drag all four messes of small fish into a macro and run it, our character will only eat one of them, even if we have all four in our backpack. If we add delays between each mess of small fish, our character will eat all four, but now the macro takes a while to run. As we fish though, we only get one mess of small fish at a time. So, if we set our macro up correctly, and recognize we only need to consume a single mess of small fish each action, we should be able to eat all the messes of small fish as we fish them up. If we don't get a mess of small fish, the macro will proceed unaffected through those “eat small fish” instructions.
--
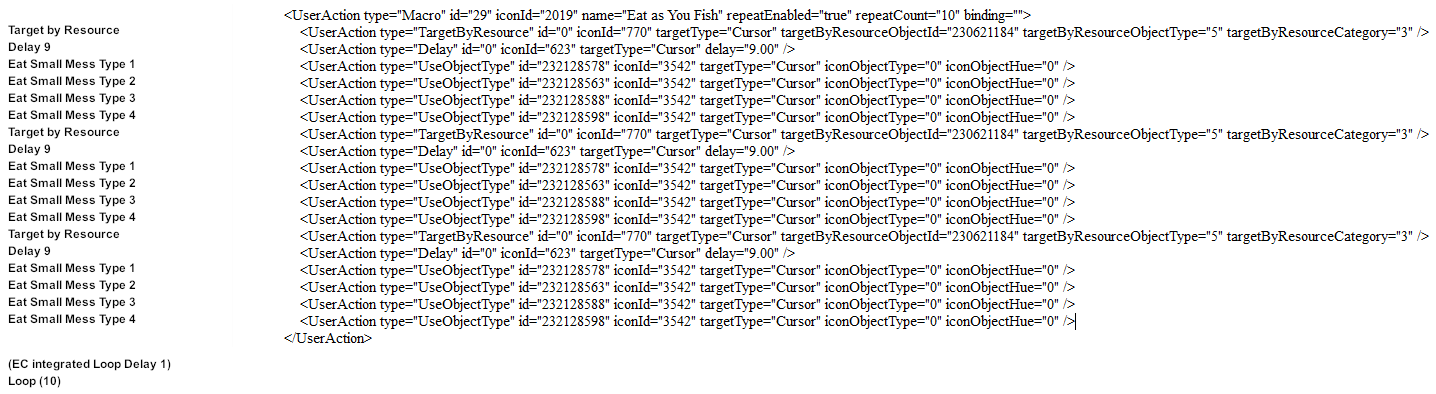
Eat as You Fish Macro: We want this macro to fish, delay, and eat the messes of small fish.
Target by Resource
Delay 9
Eat Small Mess Type 1
Eat Small Mess Type 2
Eat Small Mess Type 3
Eat Small Mess Type 4
Target by Resource
Delay 9
Eat Small Mess Type 1
Eat Small Mess Type 2
Eat Small Mess Type 3
Eat Small Mess Type 4
Target by Resource
Delay 9
Eat Small Mess Type 1
Eat Small Mess Type 2
Eat Small Mess Type 3
Eat Small Mess Type 4
(EC integrated Loop Delay 1)
Loop (10)
For this macro we are repeating a set of instructions (Target by Resource, Delay 9, Eat 1, Eat 2, Eat 3, Eat 4) three times. Every time we fish our character will attempt to eat a small mess of fish. The character will only eat one small mess of fish, but that's all we need, since we will only fish up a single small mess of fish each cast. The timing on the macro is still the same as before (9 + 9 + 9 + 1) 28s per loop, x10 loops or 280 (10 x 28) seconds, but we no longer have to deal separately with the messes of small fish. Plus, our character gets constantly buffed from eating all the small fish, no spinach needed!
Below left is the Eat as You Fish macro in the EC's UI. Below right is the macro as code in our Character File.--
Well, since that worked and we only get one set of footwear each time we fish, let's run the Footwear Organizer each time we fish as well. If we get a mess of small fish, our character will eat it. If we get footwear, we'll feed it to a goat. If we get neither, the macro will just continue on fishing.
Oh wait, running an organizer from a macro isn't included in the EC's default actions. We'll have to use Actions>Command to run the organizer. Since that is a more complex process, let's take small steps and get the Footwear Organizer to run as a standalone macro first.
Normally organizers are executed via mouse click. Since we will be executing this organizer through code, we will need to gather a couple pieces of information: the number of the Footwear Organizer in the organizer list and the Object ID code of our character's main backpack. Follow the links at the top of the thread to discover how to obtain those two pieces of information. Below is some visual help to accompany the thread links: Organizer number on the left, Object ID on the right.

For this example, let's use the following numbers:
3 = Place of Footwear Organizer in the Organizer List
100100100 = Object ID of our character's main backpack.
Run Footwear Organizer: We want this macro to execute the Footwear Organizer. We don't want to have to click on a container, select an organizer, and then re-click to execute that organizer.
Below left is the Run Footwear Organizer macro as a concept. Below right is that same macro with code that must be submitted via Actions>Command in the in-game UI.

This macro will select the footwear organizer, run that organizer, wait for 10 seconds to feed the footwear to the goat, and then stop. It does not loop.
Below left is the Run Footwear Organizer macro in the EC's UI. Below right is the macro as code in our Character File.

You can stop at this point and setup individual macros for each of your organizers if you'd like. You can then run those organizers via hotbar or hotkey as you see fit. Most, if not all, of my 14 fishing organizers are setup to be executed as macros. This saves me from having to select each organizer from the list on a container, and then re-click to execute the selected organizer.
--
Ok, now that we know how to get the Footwear Organizer to run as a standalone macro, let's incorporate the organizer into our fishing macro.
Fish Eat Feed Macro: We want this macro to fish, delay, eat all the messes of small fish, and feed the pet footwear.
Below left is the Fish Eat Feed macro as a concept. Below right is that same macro with code that must be submitted via Actions>Command.

This macro still only performs the same thing three times, but the "thing" is now much more useful, and complex. Our delay per instruction "set" is 11 (9 + 1 to select the organizer + 1 to feed the pet) and a single pass through the macro is (11 + 11 + 11 + 1) or 34 seconds. The macro still loops 10 times and as such is now 340 (10 x 34) seconds long.
Below left is the Fish Eat Feed macro in the EC's UI. Below right is the macro as code in our Character File.

1 = Place of Shallowwater Fish Organizer (Shore) in the Organizer List
Run Shallowwater Fish to Hold Organizer: We want this macro to execute the Shallowwater Fish Organizer. We don't want to have to click on a pack, select an organizer, and then re-click to execute that organizer.
Below left is the Shallowwater Fish to Hold macro as a concept. Below right is that same macro with code that must be submitted via Actions>Command.This macro will select the Shallowwater organizer, run that organizer, wait for 12 seconds to allow each type of fish to be moved to the hold, and then stop. It does not loop.
Below left is the Run Shallowwater Fish to Hold Organizer macro in the EC's UI. Below right is the macro as code in our Character File.

--
Ok, now that we know how to get the Shallowwater organizer to run as a standalone macro, let's incorporate the organizer into our fishing macro. Just as with messes of small fish and footwear, we are only catching one thing at a time, so the delay for organizing that one thing is 1. If we don’t pull up a fish, the macro will simply progress.
Fish Eat Feed Hold Macro: This macro will fish, eat the messes of small fish, feed footwear to the pet, and put fish in the hold.
Below left is the Fish Eat Feed Hold macro as a concept. Below right is that same macro with code that must be submitted via Actions>Command.

As a summary, this macro will still only do three "sets" of instructions, but the set of instructions is now really four things (fish, eat small messes of fish, feed footwear to the pet, and put fish in hold) with delays. The delay per instruction set is now (9 + 1 set to footwear +1 feed footwear+ 1 set to fish + 1 move fish to hold) 13 seconds and one pass through the macro is (13 + 13 + 13 +1) 40 seconds. The macro still loops 10 times and the total run time is 400 (10 X 40) seconds.
Below left is the Fish Eat Feed Hold macro in the EC's UI. Below right is the macro as code in our Character File.

--
Now that we have a useful macro written, we can reorder the instructions within the macro to make the macro more efficient. So far we have been Delaying 9 for the fishing action, 1 to set the Footwear Organizer, 1 to run the Footwear Organizer, 1 to Select the Shallowwater Organizer, and 1 to run the Shallowwater Organizer. Since a fishing action is only 8 seconds, and this macro is working well, let's reorder the instructions to eat the messes of small fish and run the organizers while we are waiting on the fishing action to complete.
On the first pass of the macro, not much will happen with the first set of instructions, since the first fishing action hasn't completed, and we will not have anything in our pack to act upon. However, all subsequent instruction sets, on all remaining passes through the macro, will work as expected. In other words, if we setup the macro to fish 1000 times, only the 1st instruction set will not have anything in our pack to act upon, the following 999 will.
Fish Efficiently Macro: This macro will fish, eat the messes of small fish, feed footwear to the pet, and put fish in the hold, all within the 8 second fishing action.
Below left is the Fish Efficiently macro as a concept. Below right is that same macro with code that must be submitted via Actions>Command.

For clarity, this macro has been reduced to a single instruction set that loops 10 times. Each instruction set takes 8 seconds to complete, plus 1 second for the Loop delay. The macro runs for a total of 90 (10 x 9) seconds.
You could copy and paste the entire instruction set, from Target by Resource to Delay 2, as many times as you want. If you pasted in 9 more instruction sets, you would have 10 total instruction sets, and the macro would run 80 (10 x 8) seconds. With the 1 second integrated loop delay that would be 81s per loop. The macro is set to 10 loops and therefore the entire macro would run for 810 (10 x 81) seconds.
Below left is the Fish Efficiently macro in the EC's UI. Below right is the macro as code in our Character File.

--
Writing long Macros.
When writing a macro, you can make the instruction list as long as you would like. The longer the macro, the more time consuming and frustrating it is to build in the in-game UI. To write long macros you’ll probably end up working directly in the Character File. However, long macros take up a lot of space in the Character File and require a lot of scrolling to get through, making the Character File cumbersome to work with. As such, you will probably end up keeping copies of the macros you write in separate .txt files and only having a single long macro in your Character File at once. This also means you’ll develop a library of macros you can easily transfer to other characters or have as backups in case something bad happens with your EC install.
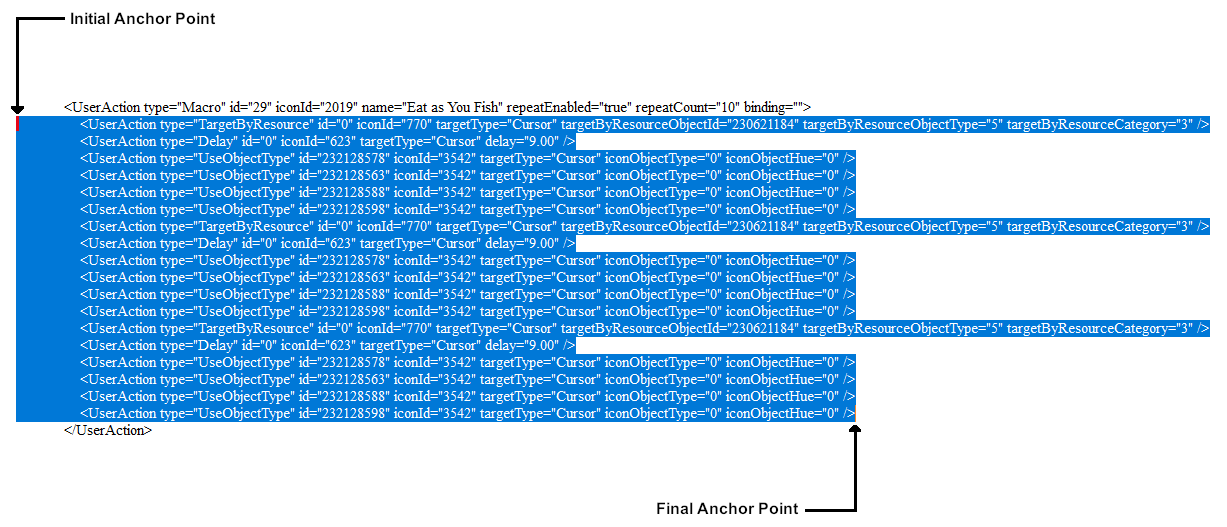
Here are a few tips I've learned from my experiences writing, storing, and transferring long macros. For these examples, we'll use one of the earlier macros in this thread, Eat as You Fish, which is just long enough to see the patterns, but still short enough to fit in a screen shot.
Below left is the concept Eat as You Fish macro. Below right is the macro as code in our Character File.
When extending the number of macro instruction sets within the Character File, or a .txt file, place the cursor to the left aligned point of the first instruction, just below the macro header, and click once. This sets the initial anchor point. Next, while holding down Shift, place the cursor after the last character of the final instruction you wish to repeat, just above the </UserAction> line, and click once. This will set the final anchor point and highlight the block of text, with correct spacing, for the instruction set(s) you want to repeat.
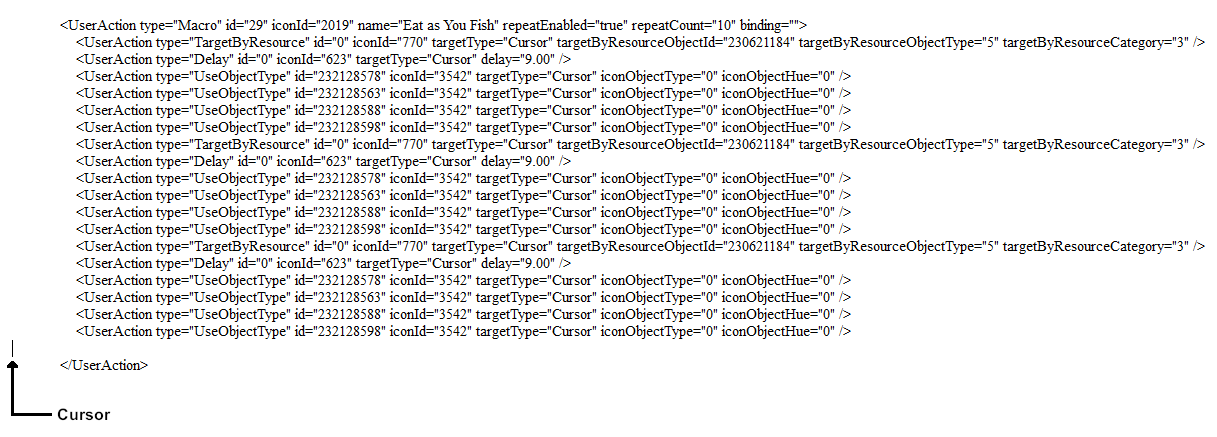
Press "Control-C" to copy the selected block of text into the clipboard. Then, click on the final anchor point again and push "Enter" once. This will create a new line and place your cursor at the correct position on that new line.
Press "Control-V" to paste your copied block of text into the available space. You've just tripled your macros instruction sets!
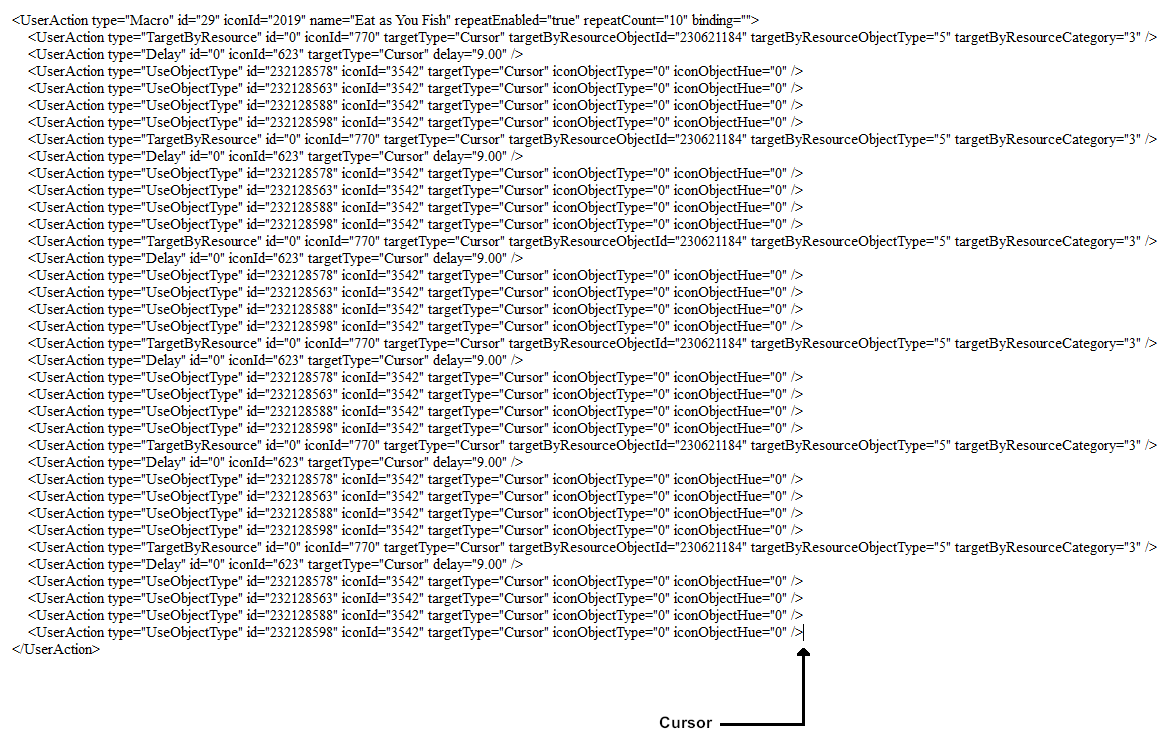
However, notice how the cursor is now at the end of the last line of the instruction set? Push Enter and Control-V again to add another instruction set. You can keep pushing Enter, Control-V to quickly add numerous instruction sets. Once you’ve made a larger block of instructions, you can select that larger block and Copy / Paste it instead, rapidly expanding the macro. This is why working in the Character File is so much easier when writing long macros.
--
Ok, now that we know how to work with macros in the Character File and quickly write long macros, let’s think about how we can best use this to improve our UO experience.
First, backup your macros. Highlight the macro from the opening tag (<UserAction type=”Macro” id=…) to the closing tag (</UserAction>) and copy the entire thing into a .txt file. I personally have individual .txt files for almost all my macros. These work not only as backups, but make it easy to transfer the macros quickly among characters, and ensure that all the macros for all characters have the same icons, names, etc.
With long macros, I save the basic macro, with only a single instruction set, as a backupBase.txt. I also save the same macro, normally with a set of 10 instructions, as backupTen.txt. If I open one of my .txt files and push Control-A, everything in the file, from the opening tag to the closing tag is highlighted and I can easily Copy /Paste the entire macro into a Character File.
You may want to hash / star out the MacroID number, so you remember to reset the number for each Character File you import the macro into. This will prevent potential conflicts with existing macro numbers in Character Files.
Second, just because we have the ability to write ridiculously long macros, does not mean we should, or that they are of any benefit to us. For skill training, sure, a macro that runs for a long amount of time can be wonderful. However, during any other type of gameplay, some “thing” will almost always happen to cause that macro to be interrupted. If you find yourself constantly pushing “ESC” to break a macro, or have a macro that never runs to completion, you might want to consider rewriting that macro to be shorter.
So, how long should a macro be? That's up to you, but keep in mind the servers reset every 24hrs, so it's pointless to have a macro which exceeds that time limit.
Basic Math
60 Seconds in 1 Minute
3600 Seconds in 1 Hour
36000 Seconds in 10 Hours
72000 Seconds in 20 Hours
86400 Seconds in 24 Hours
A macro can loop 10 times, and 86400 / 10 = 8640, so any macro with instructions that exceed 8640 seconds is pointless.
More realistically, there will be some other limiting factor on a macro, like how much weight your backpack can hold, or how many fish are in a resource tile. If you're fishing into your backpack, you're working with about 500 stones. Each fish weighs 10 stones, so your limit is about 50 fish (500/10), or 50 fishing attempts. The actual limit might be 60 attempts, if you want to account for footwear / small fish and still fish until your pack is full. However, even if you're limit is 60 attempts, a good fishing macro that will fill your pack would still only have 6 instruction sets and loop 10 times. That's a pretty short, workable macro.
Your time is yours and if you want to spend it writing long macros when you don't need to, that's up to you. Just remember you don't need long macros for everything you do. Spend a bit of time to figure out what you actually want to accomplish first and you'll save yourself a lot of time in the long run.
--
Using Actions>Commands to direct Organizers to non-default containers.
When you are executing an organizer via macro, you do not have to use the default container. In fact, you do not have to have a default container set at all.
The line:directs the items in the organizer to whatever you have set as the default container for that organizer.
This line can be changed to use the Object ID of whatever container you want the items to end up in. To send items to a non-default container for that organizer, use the line:
where Object ID is replaced by the Object ID of the destination container.
For instance, if the Object ID of the container you wanted the items to end up in was 101010, the line would be:
This functionality allows you to skip setting default containers for your organizers if you would like. It also allows you to use the same basic organizer, but with different macros to send the contents of that organizer to different containers.
Why would you do this? Let's say I want an organizer to move shore fish from my backpack to my hold, and another to move shore fish from my backpack to a chest in my house. I could write two shore fish organizers, each with all 12 fish, set the default container for the first to my hold, and the default container for the second to the chest in my house. I could execute either using the macro examples from earlier in the thread, or by selecting and clicking on the correct organizers from my backpack, but I would still have two organizers. If I wanted to move shore fish from my hold into a pet's pack I'd need a 3rd organizer, with third destination container, or a 4th organizer with a 4th destination container to move shore fish from my backpack into my pet's pack. Eventually your list of organizers balloons to unrealistic numbers and even with specific macros to trigger each organizer, things get messy.
An easier method is to write a single organizer for a specific fish type, say Shallowwater, and assign it a default destination container, say the chest in your house. With the organizer ready, you can trigger it via mouse click on your backpack or write a macro to execute it. You can also use the above Actions> Command, with the Object ID of different containers, to direct that single organizer into whichever container you’d like.
Below left is a macro directing a Shallowwater Fish organizer into the default container for that organizer. Below right is a macro directing the same organizer into a non-default container.--
Using agents and pets to transport fish.
If you are fishing into your hold and then transporting the fish to your house for storage, here are some things that might be helpful in moving all that fish around. First, fish with the new fish graphics weight 10 stones, so 100 of them are 1000 stones. Second, fish with the original 4 fish graphics change weight. Original graphics fish also weigh 10 stones, until you pick them up and try to drop them in your backpack, or a pet’s backpack. At that point they lose weight, to 1 stone each. So, a stack of 100 is only 100 stones.
Moving the newer fish graphics in stacks of 100 is ideal, since that is 1000 stones and a fisherman's bushel just happens to hold 1000 stones. A stack of 100 will drop into the bushel, a stack of 101 will not. A pack animal can carry 1600 stones, so if you put 3 fisherman's bushels in the pack animals pack, you can place a stack of 100 of the newer fish graphics in each bushel, and easily move 3000 stones of fish at once. With 5 pack animals and 15 fisherman's bushels, you can move 1500 of the newer graphics fish, or 15000 stones, in one trip. You can clear out a Britannian Ship’s 28000 stone hold in 2 trips.
Technically, you can place a 4th fisherman's bushel in the pack animals pack, giving you a maximum of 3196 stones, as each empty fisherman's bushel weighs 1 stone. So, a fully loaded pack animal with 4 fisherman's bushels can carry 319 newer graphics fish.
The fish with the original graphics can also be placed into a fisherman's bushel in a stack of 100, but not 101. However, after the stack of fish with original graphics has been placed in the fisherman's bushel, the weight will be reduced from 1000 to 100 stones. Another stack of 100 of the fish with original graphics can then be placed in the fisherman's bushel. This process can be repeated up until you've hit the fisherman's bushel weight limit of 1000 stones.
If you have pack animals with 1000’s of stones of fish, you probably don't want to drag and drop all of that into the storage container in your house. Using the examples from earlier in the thread, you can write a long organizer macro to move all the fish, from all the bushels, in all the pack animal's packs, into the desired storage container(s) in your house, with one keypress.
--
We can write out that macro as a concept and you can use the examples from this thread to flesh out and build that macro yourself. Before writing the concept, think about how an organizer has to work. First, the container from which you are going to run the organizer has to be open. Second, the container where you are going to place the items has to be open. Third, you have to run the organizer.
For this example, let’s say you have written a Shallowwater Fish Organizer. You have a chest in your house and within that chest you have a bag where you want to put Shallowwater Fish. You also have a pack animal with a Fisherman’s Bushel that holds 1 stack of Shallowwater fish. How would we setup a macro to move the fish?
Well, to write the macro we are going to need some information. We will need the position of the Shallowwater Fish Organizer from the list of organizers, the Object ID of the chest, so that we can open it, and the Object ID of the bag, so that we can open it. We are also going to need the Object ID’s of the pack animal and the Fisherman’s Bushel, so that we can open those. Using the list of organizers and the Object ID thread linked at the beginning of this thread, we can obtain the following example information:
1 = Position of Shallowwater Fish Organizer in the list of Organizers
999999999 = Object ID of the chest
888888888 = Object ID of the bag in the chest where we want to put the Shallowwater Fish
222222222 = Object ID of the pack animal
111111111 = Object ID of the Fisherman’s Bushel
With the information above, let’s write a concept macro to move fish from the Fisherman’s Bushel to the bag within the chest.
Fish Mover Concept Macro:
HandleSingleLeftClkTarget (999999999) - Target the Chest
Use Targeted Item - Open the Chest
Delay 1 - to open the chest
HandleSingleLeftClkTarget (888888888) - Target the bag
Use Targeted Item - Open the bag
Delay 1 - to open the bag
HandleSingleLeftClkTarget (222222222) - Target the pack animal
Use Targeted Item - Open the pack animal
Delay 1 - to open the pack animal
HandleSingleLeftClkTarget (111111111) - Target the Fisherman’s Bushel
Use Targeted Item - Open the Fisherman’s Bushel
Delay 1 - to open the Fisherman’s Bushel
Organizer.ActiveOrganizer = 1 - Select the Shallowwater Fish organizer
Delay 1 - to set the organizer
ContainerWindow.OrganizeParent = 111111111 - to run the organizer on the Fisherman’s Bushel
ContainerWindow.OrganizeBag = 888888888 - to put the fish in the bag
ContainerWindow.Organize = true - to run the organizer
Delay 1 - to allow the organizer to move the fish
ContainerWindow.Organize = false - to stop the organizer
Loop(0)
That’s it. A macro you can set to a hotkey that will move fish from a fisherman’s bushel in a pet’s pack to a bag in a chest in your house. If you want to expand the macro, since the containers are all open and the organizer selected, you can repeat the last few lines to select the next Fisherman’s bushel (where XXX = Object ID of the next Fisherman’s Bushel).
ContainerWindow.OrganizeParent = XXX - to run the organizer on the next Fisherman’s Bushel
ContainerWindow.OrganizeBag = 888888888 - to put the fish in the bag
ContainerWindow.Organize = true - to run the organizer
Delay 1 - to allow the organizer to move the fish
ContainerWindow.Organize = false - to stop the organizer
If you have many types of fish in a single Fisherman’s Bushel, you would need to increase the final delay to give the organizer time to move that number of types of fish. I.E., if you had 6 types of fish in the bushel, the final delay would need to be 6. That is why it is better to have 1 type of fish in each bushel. The macro and organizers can move through the bushels, 1 type of fish at a time, with a delay of 1 to move each single stack of fish.--
Parting thoughts:
Ok I hope that helps people with fishing. You can expand the concepts presented in this thread to cover Deepwater, Dungeon, and Crab / Lobster fishing. The same type of macros and setup can also be used for anything else you might get up to, such as mining, lumberjacking, or really any resource gathering or mass organization you'd like to accomplish. One last tip is to remember to start with small macros, get those working, and work your way up. The EC's macro system can get very deep and it is easy to get overwhelmed and discouraged. Remember, you can always ask for help.
Finally, I know people are wondering about, and have asked me about, fishing for crab / lobster. The macros I use are variations of what I have posted above, but with trap and crab / lobster organizers, instead of fish and footwear organizers. If I find time, I'll try to write up a post specifically about crab / lobster fishing, but don't hold your breath. The information posted above and a programmable keyboard (or software) to control your mouse click position is the only thing you need to go crabbing / lobstering for hours on end.
Good luck!