Ultima Online Enhanced Client Walkthrough – Character File
The following discussion is intended to be a basic walkthrough for the character file; the file’s organization, a couple of tips for what to look for where, and some basic template creation. This is not a line by line code breakdown, nor is it an exhaustive explanation. Having said that, this may still be a bit technical, so read on as you desire.
In Ultima Online’s Enhanced Client (EC) each character has a unique file (the character file). This file contains a host of information about how you have chosen to setup the user interface (UI) for that character. The information in the character file includes widow positions and settings, all of the hotbar information for that character, all of the macro information for that character, all of the agent information for that character, key bindings, UI options, and more. The file is updated during play and is saved when the character successfully logs out of the game.
Since each character has unique UI settings stored in their character file, each character can have their own specific UI configuration. Character specific UI’s can be beneficial when using different types of characters for different types of tasks, but can be frustrating when you’re starting a new character and have to set everything up again. By understanding a bit about the character file, you can exercise more control over the customization of your UI and significantly reduce the hassle of setting up the UI for new characters.
Let’s get started!
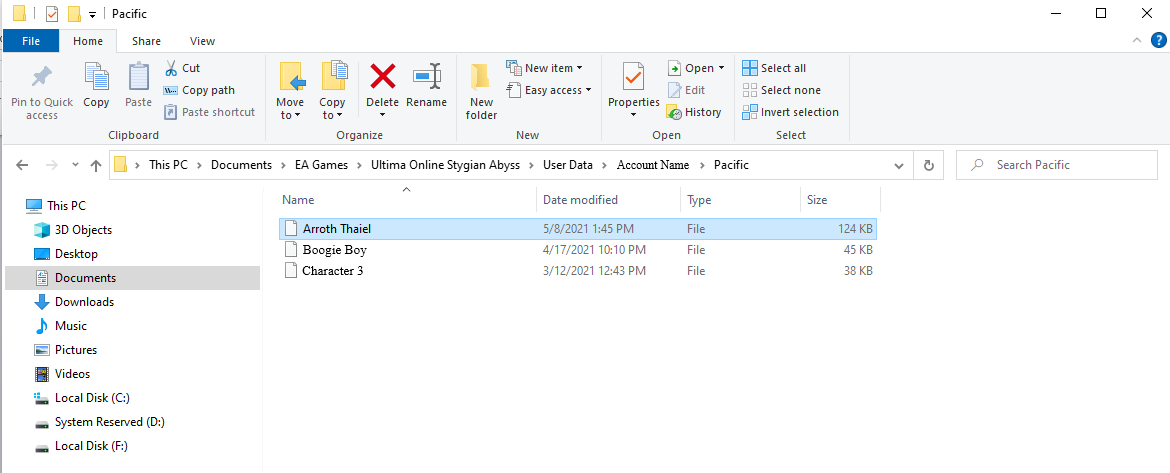
By default, the character file is stored in your documents folder, in the following path:
Documents > EA Games > Ultima Online Stygian Abyss > User Data > Account Name > Shard

The
character file can be opened using a text editor such as Notepad or Wordpad.
The code within the character file uses specific syntax to indicate beginning and ending segments.
For a single line of code: < indicates beginning, while /> indicates ending.
<CameraZoom Value = “16.000” />
For a code chunk: <> indicates the beginning of the chunk, while </> indicates the end of the chunk.
<Containers>
code, code, code
</Containers>
The character file is divided into sections, with basic organization as:
General
Settings
Window Settings
Hotbars
Macros
Key Bindings
Options (From in game User Settings > Options tab)
UI Variables
General Settings
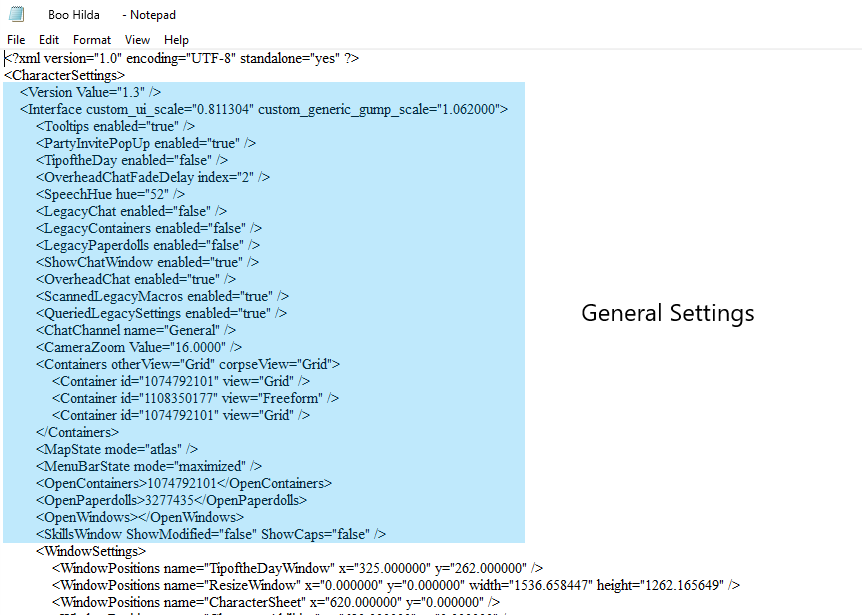
At the beginning of the character file, prior to the <WindowSettings> section, is a group of 20 or so single lines of code that determine the basic settings of the UI upon login. Most of these are self-explanatory and control things like whether or not the “Tip of the Day” is shown, the Camera Zoom you start with, etc.

One thing to pay attention to in this area is <Containers> as the first number in this list is the ObjectID of your characters main backpack. We tend not to think of the main backpack as a world object, but it is, it has an ObjectID, and therefore can be targeted as any other object.

Sometimes you will see additional <Container id> in <Containers>. The additional id’s are those of any containers in your main backpack. The <OpenContainers> line, just below <Containers>, controls how many of those containers are open on login.
The line of code below would indicate two open containers on login: the main backpack and a container within the main backpack.
<OpenContainers>103957875,104648933</OpenContainers>
Window Settings
The section of the character file contains the code for the position and/or size of each UI element on your screen. The position is measured in x, y coordinates from the top left corner of your gameplay window, to the top left corner of the UI element. The x axis is the horizontal axis (left – right) of your monitor, the y axis is the vertical axis (up – down) of your monitor. Some UI elements have transparent borders or boxes, in which case the measurement is to the upper left corner of the transparent border or box.
In <WindowSettings> you will find “ResizeWindow” which records the width (x-axis) and height (y-axis) of your gameplay area. By expanding the gameplay area (NW pointing grey arrow on the bottom right of the gameplay frame) to fill your screen you can determine how many units of space you have to work with in different Windowed Mode or Full Screen settings. Maximizing the gameplay area is a quick way to determine the dimensions of your play space. In the image below, the gameplay area is maximized in a mostly square Windowed Mode, giving 1536 units width and 1262 units height of total play space.

As seen in the above image, the upper left corner of Hotbar3 is the 1245th unit from the left edge of the play space and the 888th unit from the top of the play space. Hotbar3 extends 270 units to the right of, and 50 units down from, that starting unit. Hotbar frames are 50 units high and 50 units wide. Hotbar3 displays 5 frames, so should be 250 (5x50) units wide. However, Hotbar3’s handle is displayed, adding 20 units to the width of the hotbar, for a total of 270 units in width.
Hotbar2
begins at the 920th unit from the left edge of the play space and
the 1187th unit from the top of the play space. Hotbar2 extends 600
units (12 frames x 50 units per frame = 600 units, no handle) to the right of
the starting unit and 50 units down from the starting unit.
The positions of the UI elements are recorded in <WindowSettings> as those elements are created. As such the code for similar elements will be scattered through the <WindowSettings> section, rather than grouped. You can cut and paste similar code into ordered groups if you’re a neat freak. In addition to aligning hotbars, you can use <WindowSettings> to position your Main Backpack and Loot Bag, the Runebook, buff/debuff bars, Party Health bars, Mobiles bars, and all the rest of the UI elements. By changing the parameters of the various lines of code in <WindowsSettings> you can control the layout and alignment of your UI down to the individual pixel. This isn’t for everyone, but for some people the ability to perfectly align UI elements is…fantastical.
Unfortunately, some UI elements are programmed to override the settings in <WindowSettings> and reappear in the default position. For instance, the EC creates default hotbars when a new character is created. Hotbar2 is the default hotbar containing menu icons. Even if you delete Hotbar2 information from the character file, the EC will still auto-magically recreate a hotbar with menu icons the next time you log in.
Hotbars
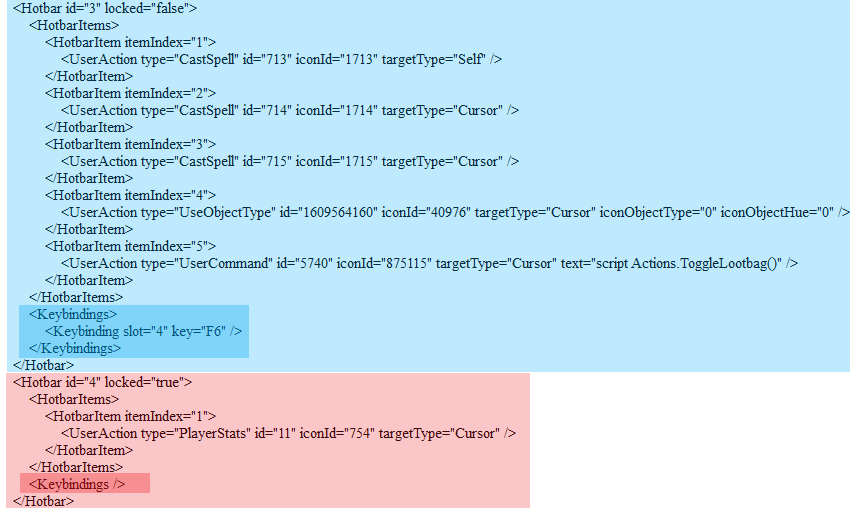
In the <Hotbars> section of the character file you will find the code related to the contents of the hotbar and the hot keys used to execute those contents. Each hotbar will be divided into two sections, <HotbarItems> and <Keybindings>.

In the above image you can see the code chunks for two hotbars, Hotbar 3 and Hotbar 4. Hotbar 3 has 5 items (itemIndex) but only item 4 (Keybinding slot = 4) has a hotkey (F6) assigned. Hotbar 4 has only a single item and no hotkey is bound to that item.
In the line <Hotbar id =”” locked = “false”>, the locked = “false” parameter indicates the hotbar handle is not displayed. If locked = “true”, the hotbar handle is displayed. The state of the locked parameter must correlate with the width of the hotbar in <WindowSettings>.
If locked = “false”, the handle is displayed and the hotbar must be 20 units wider than the total of the hotbar frames (each frame being 50 units wide).

If locked = “true”, the handle is not displayed and the hotbar is the width of the hotbar frames (each frame being 50 units wide).

For each hotbar, you can copy the hotbar position information from <WindowSettings> and the hotbar code chunk from <Hotbars> (as in the above image). With these two pieces of information about the hotbar you can transfer a hotbar between characters, or keep copies of your hotbars for backup. Customizations for hotbars (such as frames) are found as <NumberVar…> lines in <UIVariables>, the final section of the character file.

Comments
Macros
Macros are defined as <UserAction> in the Character File. The order macros appear in your Character File is also the order in which they appear in your in-game macro list. Macros are numbered (id) in ascending order as they are created.
Each macro will be written as:
<UserAction…> This is the Macro header.
<UserAction...> This is an instruction within the Body of the Macro.
</UserAction> This ends the Macro.
Each macro will have one header. The first variable in the header will be the Macro id. Each macro can have many instructions. These instructions form the body of the macro. Each macro will have one end.
In the image below two macros are highlighted. The first highlighted macro is the first macro in the <Macros> section. As such, this is the first macro that will appear in the in-game macro list. The header of the first highlighted macro shows that the Macro is id = “1”. The header also shows this macro is using icon 773, is named “AttackCurrent”, is not repeating, and is bound to the 5th mouse button. This macro only has one instruction. That instruction is “AttackCurrentTarget” by “Cursor”.
The second macro highlighted in the above image is Macro id = 26. However, since this macro is the fifth macro in the <Macros> section, it will be the fifth macro in the in-game macro list. In addition to the id, the header also shows this macro is named DrinkWithBlackheart, the entire instruction set repeats 6 times, and the macro does not have a hotkey. In the body of this macro are 12 instructions: 6 “UseObjectType” and 6 “Delay”. This macro uses a type of object, targets self, delays 1 second, then repeats those actions 5 more times. When the macro finishes running (all 6 instructions are complete) the macro then runs 5 more times (repeatCount = “6”).
A macro may only repeat 10 times. If you set repeatCount =”” to any value greater than 10, the UI will return the value to 10 on login. However, a macro’s body can contain an unlimited set of instructions. If you write a macro with 100 identical instructions and set it to repeat 7 times, the macro will execute the instruction 700 times.
By copying a macro’s header, body, and end, the entire macro can be backed up to a file, or ported between characters. You can also rearrange macros in your in-game macro list by rearranging those macros in the <Macros> section of the Character File.
Key Bindings and Options
The <KeyBindings> and <Options> sections of the Character File contain most of the inputs that you can control within the “User Settings” section of the Main Menu in game. However, if the option cannot be selected in game, it will not be included in these sections. Between these two sections you will find the list of custom skills for that character. Rearranging the skills here will also rearrange them in the in-game skills list.
UI Variables
The <UIVariables> section is divided into four subsections:
<StringVar…>
<WStringVar…>
<BoolVar…>
<NumberVar…>
The <UIVariables> section is where you will find information regarding your characters agents along with many of the choices you make to customize various components of the UI as you play.
In <StringVar…> you will find the name of each item in your agents, listed as the items were added to each agent. You can cut and paste lines to regroup your agent information into code blocks.
<WStringVar…> contains the name of each of your agents as it appears in the in-game context menus.
"<BoolVar…> indicates the true/false values (Booleans) for many of the choices you made to customize your UI. <BoolVar…> lines can also contain information for hotbar sizes and lock status that may conflict with the information in the hotbar section. This most often happens if you try to control the hotbar in-game via the handle, but then also use the padlock icon. If you’re trying to manipulate your hotbars via the hotbar section, but find they are just not behaving as you’d like, look for conflicting hotbar information in the <BoolVar…> section and delete it. Do not delete hotbar information from the hotbar section, or you may remove the hotbar.<NumberVar…> lines store the values for a multitude of conditions in the UI, from gump information and menu selections, to hotbar customization (frames) and id codes, along with all the item code information for a character’s agents.
This section also stores large numbers of lines with ScrollGrid information.
<NumberVar name="ScrollGrid1103110715" value="0.000000" />
ScrollGrid lines relate to the position you were last scrolled to in a specific object (container). These lines can be safely deleted when working in the character file, but the UI will not remember the last scrolled position for that object if you delete the objects ScrollGrid line."Agents
Agent information is stored completely in the <UIVariables> section of the character file.
<StringVar…> stores the name of each item in an agent and that items position within the agent.
<WStringVar…> stores the name of the agent.
<BoolVar…> stores whether a container closes after the agent completes.
<NumberVar…> stores the Icon, Hue, and ObjectID for each item in the agent, along with the total number of items in the agent and the destination container for the agent.
By transferring the above information into a text file, the entirety of Organizer 2 “Gems” can be saved. Each of the four information code chunks can also be transferred into the corresponding variables subsection of <UIVariables> in another character file. Because the destination container (the last line in the above image) is an object id, the destination container will also transfer between characters.
If agents are ported between characters, make sure that all of the code lines for each agent are numbered correctly. All information for Organizer2 must be numbered as 2, etc. The number of an agent you want to import to a character file cannot conflict with an already existing agent. If an agent’s number already exists, simply re-number each line of code for one of the agents, either the existing agent or the agent you wish to import.
As a final step in importing an agent into a character file you must tell the UI that the agent exists. There will be a line of code in <NumberVar…> to accomplish this for each agent type.
In the above code, the value for “OrganizerOrganizer” must match the number of organizers in <UIVariables>. If the value for OrganizerOrganzier is 3, only organizers 1 thru 3 will be seen by the UI. In code above, the number of Organizers the UI can read is 6. If a new Organizer (7) was imported, even if each line of new Organizer 7 was carefully re-numbered, the UI would not read new Organizer 7. The value of OrganizerOrganizers must be changed to 7 for the UI to read the new organizer.
Changing the line in the following manner will allow the UI to red Organizer 7:
<NumberVar name=”OrganizerOrganizers” value=”7.000000” />
The value of “OrganizerActiveOrganizer” indicates which organizer appears in the context menu by default.
Comments about working in the Character File
Always backup your character file before working in the file. A few seconds to create a backup of the file can save you a lot of frustration if you accidently delete or change the file in an unintended way.
If you log into a new character and arrange all your UI elements, then log out, you can copy and paste the entire new characters file into a text document and have a template to work from in the future. Creating templates for your preferred UI setup, your hotbars, a basic set of macros, and some basic organizers can save a huge amount of time with new character creation, or standardizing your setup across multiple characters.
Be careful when creating macros or setting up scripts. The character file does not use the same formatting information as the in-game UI. If the game detects the wrong formatting information in the character file upon login, the client will reset your character file to default. This is a non-positive experience.
The most common areas where formatting becomes a problem are instructions (macros or scripts) where quotes appear in the instruction. For example, you may write a script that says something like:
script WindowUtils(“System.data”)
In the in-game UI you can type this in easily and it will appear in the mouse-over tooltip as:
script WindowUtils(“System.data”)
At this point, everything looks good, but if you check the character file you will find:
“script WindowUtils(", System.data, ")”
The in-game UI and the character file have formatted “ differently. If you make the mistake of changing the character file to… script WindowUtils(“System.data”)…, when you load the game your character file will be reverted to default.
Be careful with formatting when editing the character file.
Conclusion
The goal in writing this walkthrough was to share information and create a resource for the community about how some of the game data is stored, providing clarification as to how individual data act as components within the UI. Demystifying the character file code should demonstrate “it’s just code” and you can poke around in it without fear of messing up your whole game. Just make sure to backup your character file first. Hopefully this walkthrough helps people control more of their gameplay experience and get more enjoyment from the game.
ESRB warning: Some Blood. LOTS of Alcohol. Some Violence. LOTS of Bugs